


A wall-to-banister opening needs more than a gate that simply spans the space. At the top of stairs, the installation method, measurements, and attachment points all matter. Especially when one side is a finished wall and the other is a rounded or uneven banister.
To learn how to install baby gate wall to banister, measure the opening carefully. Choose a gate designed for that configuration, and secure it with the manufacturer-approved hardware rather than relying on pressure mounting. The Stair Barrier wall-to-banister fabric safety gate is designed for this type of installation and meets ASTM F1004 safety standards, while adult supervision remains essential.
The process can be straightforward when you confirm the fit before drilling, identify the right mounting surfaces, and follow the supplied instructions step by step. Start by measuring the opening and checking which gate size and installation approach suit your home.
Shop the wall-to-banister fabric safety gate
Before You Start: Measuring a Wall-to-Banister Opening
A wall-to-banister opening has two different mounting surfaces, so an accurate measurement is the first step toward a clean, secure fit. Before ordering or installing a gate, identify the finished surfaces where the hardware will attach: the wall on one side and the banister post on the other. Measure the open span between those points, not the width of the hallway or stair landing around it.
Measure the finished mounting points
Use a reliable tape measure and record the distance in inches. Keep the tape level from the wall mounting area to the banister post, following the line where the gate will sit. If trim, molding, a handrail, or an unusually shaped post changes the available mounting area, note that detail rather than rounding the measurement up or down.
It is also helpful to take a photo of the opening from straight on and from each side. Photos can show details that a single number cannot, such as an offset wall, a wide baseboard, or a banister that does not provide a flat surface. These details matter when deciding how the wall-to-banister configuration should be installed.
Match the opening to the correct size
The Stair Barrier sizing options are specific:
- Regular: 36" to 43".
- Wide: 43"+ to 52".
Because 43" falls at the transition between the two options, use your exact opening measurement. Review the product guidance before choosing. Do not assume that a gate can compensate for an opening outside its listed range. The wall-to-banister measuring guide provides additional direction for evaluating your space.
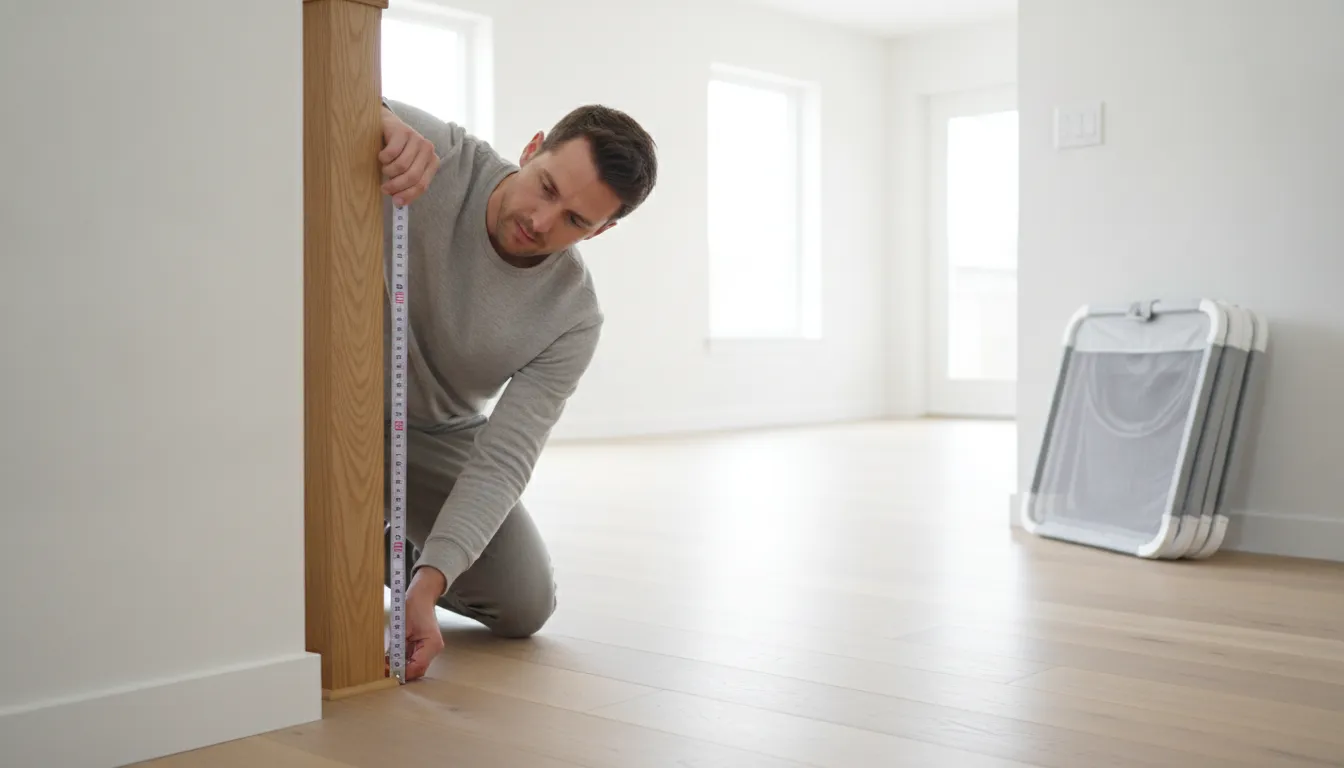
For a wall-to-banister installation, the gate is designed to span an opening where one side is a wall and the other is a banister post. You can review the wall-to-banister fabric safety gate alongside your measurements to confirm that you are looking at the right configuration.
If the opening is angled, uneven, unusually deep, or difficult to measure confidently, pause before ordering. Use the available measuring and installation resources, and share photos for support rather than guessing. A precise fit helps the installation go more smoothly and keeps the finished gate aligned with the space it is meant to protect.
How to Install a Baby Gate Wall to Banister in Six Steps
A wall-to-banister setup protects an opening where one side is a wall and the other is a banister post. Unlike a pressure-mounted gate, this configuration uses hardware at both contact points at the top of stairs. That distinction matters: safety guidance recommends attaching an approved gate to the wall while hardware-mounted gates are designed to resist shifting when a child or pet applies pressure. Read more about hardware mounting at stairways, then follow the product-specific instructions for your gate.
- Confirm the opening and mounting locations. Measure the finished opening and identify a solid, suitable surface on the wall side and a stable banister post on the opposite side. A wall-to-banister gate is intended to span this type of one-wall opening. Do not guess if the post, trim, or stair geometry is unusual. Use the manufacturer's measuring guidance or installation support before drilling.
- Read the manufacturer instructions first. Review every installation step, warning label, hardware requirement, and fit limitation before unpacking the components. Manufacturer instructions are part of a safe installation, and The Stair Barrier meets ASTM F1004 safety standards. The exact fasteners and sequence should always come from the instructions supplied with your gate.
- Mount the hardware to the wall side. Position the wall-side hardware at the prescribed height and location, keeping it aligned with the intended gate span. Mark the mounting points, confirm the fasteners are appropriate for the wall construction, and attach the hardware securely. The wall connection should be anchored to a suitable structural surface, not merely to a thin decorative layer.
- Attach the opposite hardware to the banister post. Locate the hardware on a stable, appropriate section of the post so the gate can meet it squarely. If the post is rounded or does not provide a flat mounting surface, use the approved banister adapter or mounting method for the product rather than improvising. A suitable adapter can create a secure, flat interface without drilling directly into the wood.
- Secure the gate at both contact points. Connect the gate to the wall-side hardware and the banister-side hardware exactly as directed. Check that each attachment is fully seated, latched, or fastened. A wall-to-banister installation is only complete when both sides are secured. Never rely on tension alone for a gate used at the top of stairs.
- Verify level, stability, and operation. Check that the gate is level, opens and closes as intended, and remains stable when you apply controlled pressure to the frame and mounting points. Look for movement, loose hardware, rubbing, or gaps that do not match the manufacturer's requirements. Correct any issue before use, and continue active adult supervision around stairs even after installation.
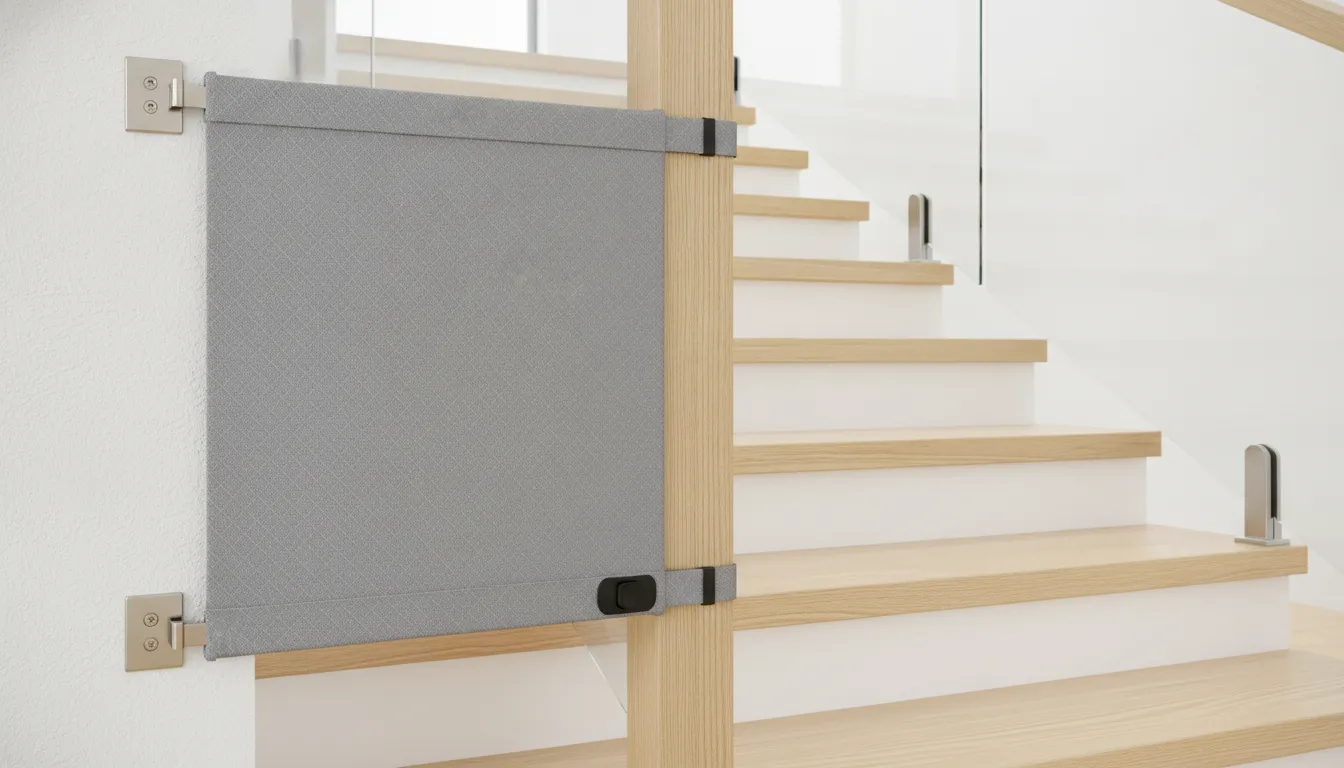
For product-specific dimensions and mounting details, review The Stair Barrier's installation video before beginning.
Hardware Mounting vs. Pressure Mounting for Stair Gates
Mounting method matters more on stairs than it does in a standard doorway. At the top of a stairway, a gate must resist movement, tipping, and pulling forces rather than simply fill an opening. Safe Kids recommends using approved safety gates at the top and bottom of stairs and attaching them to the wall when possible. Read the manufacturer's instructions and warning labels before installation.
| Feature | Hardware-mounted gate | Pressure-mounted gate |
|---|---|---|
| How it stays in place | Mounting hardware attaches the gate to a structural wall surface or suitable post. | Tension presses against opposing surfaces without a permanent hardware connection. |
| Top-of-stair use | Required for top-of-stair applications because it provides a fixed installation. | Not approved for stairway use. It can feel unsafe when a child or pet leans or pushes against it. |
| Wall-to-banister openings | Designed for securing one side to a wall and the other to a banister post. | Does not address the structural needs of a wall-to-banister installation. |
Why hardware mounting is the safer choice at the top of stairs
Top-of-stair gates must be hardware-mounted, not held in place by tension. Hardware mounting helps keep the gate in position if pressure is applied by a child or pet, reducing the chance that the gate will tip or pull down. This is why pressure-mounted gates may be convenient in some flat, low-risk openings but are not an appropriate solution for stairway protection.
For a wall-to-banister opening, the installation has two distinct attachment points: a wall surface on one side and a banister post on the other. A purpose-built wall-to-banister fabric safety gate is designed for this configuration, so the gate can span an opening where only one side has a wall. Confirm the structure at each attachment point, follow the product instructions, and use the manufacturer's recommended hardware. Safety gates should supplement, not replace, active adult supervision.
What this means for your installation plan
If you are deciding how to install baby gate wall to banister, start by ruling out tension mounting for a stairway. Measure the opening, identify the wall and banister mounting surfaces, and choose a gate made for that layout. The Stair Barrier meets ASTM F1004 safety standards, but correct placement and installation remain essential.
Why a Wall-to-Banister Fabric Gate Fits a Curated Home
A safety gate should protect the spaces where children and pets move without making the rest of your home feel temporary. A wall-to-banister fabric gate offers a more considered alternative to the bulky plastic or metal barriers that can dominate a stairway. Its softer profile works with the room around it, so the gate feels like part of the home rather than an obstacle added after the fact.
Designed to complement, not compete
The Stair Barrier uses upholstery-grade fabrics chosen for homes where materials, color, and proportion matter. With more than 20 fabric options, you can select a look that sits comfortably alongside your existing upholstery, flooring, and woodwork. That flexibility is especially useful at a stair opening, where a gate is often visible from multiple rooms.
The fabric construction also supports the practical demands of daily family life. The gate is machine-washable, making it easier to keep a high-touch area fresh without treating everyday cleaning as a major project. When you need the opening clear, the barrier rolls to the side rather than requiring a bulky panel to be removed and stored elsewhere. Its lightweight design makes that movement straightforward and supports portability when your home's needs change.
Premium materials with safety in mind
A refined appearance is valuable, but it should never be confused with a compromise in function. The Stair Barrier is designed for wall-to-banister installations, where one side of the opening is secured to a wall and the other to a banister post. At stairways, follow the manufacturer's installation instructions and use the specified hardware. The Stair Barrier meets ASTM F1004 safety standards, but no gate eliminates every risk or replaces active adult supervision.
If the configuration suits your home, explore the wall-to-banister fabric safety gate and compare the available fabric choices. A gate can be a visible part of your home and still look intentional, polished, and genuinely useful.
Avoiding Damage to Your Woodwork and Banister
A careful installation should protect the character of your staircase as well as create a dependable barrier. Before attaching anything, inspect the wall, newel post, and banister for trim, rounded edges, uneven surfaces, or fragile finishes. The goal is to give the mounting hardware a stable, flat surface without forcing it against decorative woodwork.
Use an adapter to create a flat mounting surface
Banister adapters and similar mounting systems can bridge the gap between a rounded or shaped banister and the gate hardware. They create a more suitable flat surface for attachment, so the mount can sit evenly instead of rocking against the post. This approach is especially useful when the banister profile is too narrow, curved, or detailed for direct installation.
Some no-drill approaches use a fitted wooden block or adapter around the banister. Those options may help preserve the post, but they still need to be compatible with the gate, correctly sized, and firmly secured. Do not improvise a support from loose lumber or rely on friction alone at the top of stairs. Follow the gate manufacturer's instructions and confirm that the completed installation is hardware-mounted where required. See the wall-to-banister installation kit before choosing an adapter or mount.
Protect finished wood before you position the mount
Place a clean, soft protective layer between an adapter and a painted, stained, or otherwise finished banister when the manufacturer's system allows it. Measure and mark the intended position first, then check that doors, latches, and fabric movement will remain clear. Avoid dragging hardware across the surface, and keep drill bits, screws, and tools on a nearby cloth rather than directly on the steps or rail.
If drilling into the banister is not appropriate, choose a purpose-built no-drill solution instead of creating screw holes in the wood. If the wall side requires hardware, locate a structurally sound mounting point and use the specified fasteners. A stable wall-to-banister setup secures one side to the wall and the other to the banister area without treating decorative trim as the anchor.
When the shape or finish of your staircase makes the correct configuration unclear, pause before making permanent holes. Use the measuring and installation resources, and share photos with the manufacturer for fit guidance. A little planning can preserve your woodwork while giving the gate the solid mounting surface it needs.
Common Wall-to-Banister Problems and Fixes
Wall-to-banister openings are rarely perfectly symmetrical. The wall may have trim, the banister may be rounded or uneven, and the railing may not provide a broad, flat surface for standard hardware. The right fix is to adapt the mounting points to the opening, not to force a gate into an unsuitable position.
Uneven banisters or rounded railings
An uneven banister can leave the mounting hardware tilted or create pressure at only one point. A banister adapter or similar mounting kit can create a flat surface for the gate hardware without drilling directly into the wood. It also helps position the mounting point at a consistent height, which is especially important when the opposite side is attached to a wall.
For metal, narrow, or irregular railings, do not assume that a standard clamp will provide a secure fit. Check the product instructions for compatible mounting hardware and confirm that the adapter sits firmly against the post rather than against a loose spindle or decorative trim.
Gaps between the gate and the opening
Visible gaps often mean the opening was measured at only one location, or that the wall and banister mounting points are not aligned. Measure the width at the top and bottom of the opening, and account for baseboards, molding, newel-post shape, and any angle in the stairway. Then compare those measurements with the manufacturer's approved range.
The Stair Barrier is designed for wall-to-banister installations, but it still requires the correct configuration and hardware mount. At the top of stairs, a gate should be hardware-mounted rather than held in place by tension or pressure. See the hardware-mount guidance for top-of-stair gates and follow the manufacturer's instructions before installation.
When the setup does not look straightforward
Ask for help before drilling if the banister is unusually shaped, the wall has substantial trim, or your measurements vary significantly from top to bottom. Share clear photos of both mounting surfaces along with your measurements. The Stair Barrier team can use that information to help assess fit and installation, so you do not have to guess. Start with the wall-to-banister measuring guide, then use the brand's installation and photo-support resources for a configuration-specific recommendation.
Shop the wall-to-banister fabric safety gate to protect your staircase today.
Frequently Asked Questions
Can I install a baby gate without drilling into my banister?
Yes. A banister adapter or dedicated banister-mounting system can create a secure, flat attachment surface without drilling directly into the wood. Follow the gate manufacturer's instructions closely, and confirm that the finished installation is level and firmly attached before using the opening. The Stair Barrier installation video can help you confirm the setup before you start.
How do I measure for a wall-to-banister baby gate?
Measure the opening at the top and bottom, including any trim, baseboards, or details that affect the mounting points. Choose a gate that matches the narrowest usable measurement. The Stair Barrier sizes are Regular for 36 to 43 inches and Wide for openings over 43 inches up to 52 inches. If your measurements or mounting surfaces are unusual, use the measuring guide or photo-based support instead of guessing.
Is pressure-mounting a baby gate safe for stairs?
Pressure-mounted gates are not the right choice for the top of stairs. A stair gate should be hardware-mounted so it is secured to the structure rather than held in place by tension. Safe Kids recommends using approved gates at the tops and bottoms of stairs and attaching them to the wall when possible. Always read the manufacturer's instructions and warning labels before installation.
What if my banister is uneven or rounded?
Do not force a flat gate mount onto an uneven or rounded post. Use the manufacturer's approved adapter or adjustable mounting hardware to create a level attachment point, then check that the gate aligns correctly and closes as intended. The Stair Barrier is designed for wall-to-banister configurations, but installation resources and photos can help confirm the right setup for your specific staircase.
Are fabric safety gates appropriate for wall-to-banister installations?
They can be, when the product is designed and installed for that configuration. The Stair Barrier fabric safety gate is made for wall-to-banister and banister-to-banister installations and meets ASTM F1004 safety standards. Its upholstery-grade fabric offers a softer visual fit than bulky traditional gates, but it does not eliminate the need for correct mounting, routine checks, or adult supervision.
Ready to Secure Your Wall-to-Banister Opening
Once you confirm your measurements and mounting points, you can install a gate that blends into your staircase and meets the safety requirements you expect. The Stair Barrier wall-to-banister fabric safety gate is designed for this one-wall configuration, built with upholstery-grade fabric, and made to ASTM F1004 standards. Start with the measuring guide, then fit your opening with a gate that matches your home. Shop the wall-to-banister fabric safety gate to find the right size and fabric for your space.

Written by Arden Vale
Design & Safety Specialist
Arden provides expert guidance on blending ASTM safety standards with modern interior styling, helping parents and pet owners create secure, beautiful spaces.