


A successful baby gate installation banister project begins before you open the hardware. Measure the exact span where the gate will attach, identify the mounting surface on each side, and choose a gate designed for that layout. Careful preparation helps you avoid ordering the wrong size or discovering that trim, tapered posts, or an angled landing changes the usable opening.
Use The Stair Barrier buyer's guide to identify the right gate layout before you measure.
A fabric safety gate is especially practical when a stair opening has banisters instead of two flat walls. The right model can fit a banister-to-banister or wall-to-banister opening while complementing a thoughtfully designed home. This guide explains what to measure, what to photograph, and when to ask for fit guidance. A safety gate is only one part of a safer home and never replaces attentive adult supervision.
Baby gate installation banister planning starts with the opening
Direct answer: First, identify what sits on each side of the stair opening. Two posts call for a banister-to-banister layout. One wall and one post call for a wall-to-banister layout. This decision determines the product configuration, mounting method, and measurements you need to record.
Stand directly in front of the opening and inspect both sides at the point where the gate will sit. Do not classify the opening from across the room. A surface that looks like a wall may have thick trim, a projecting baseboard, or an offset that affects where hardware can attach.
Banister-to-banister openings
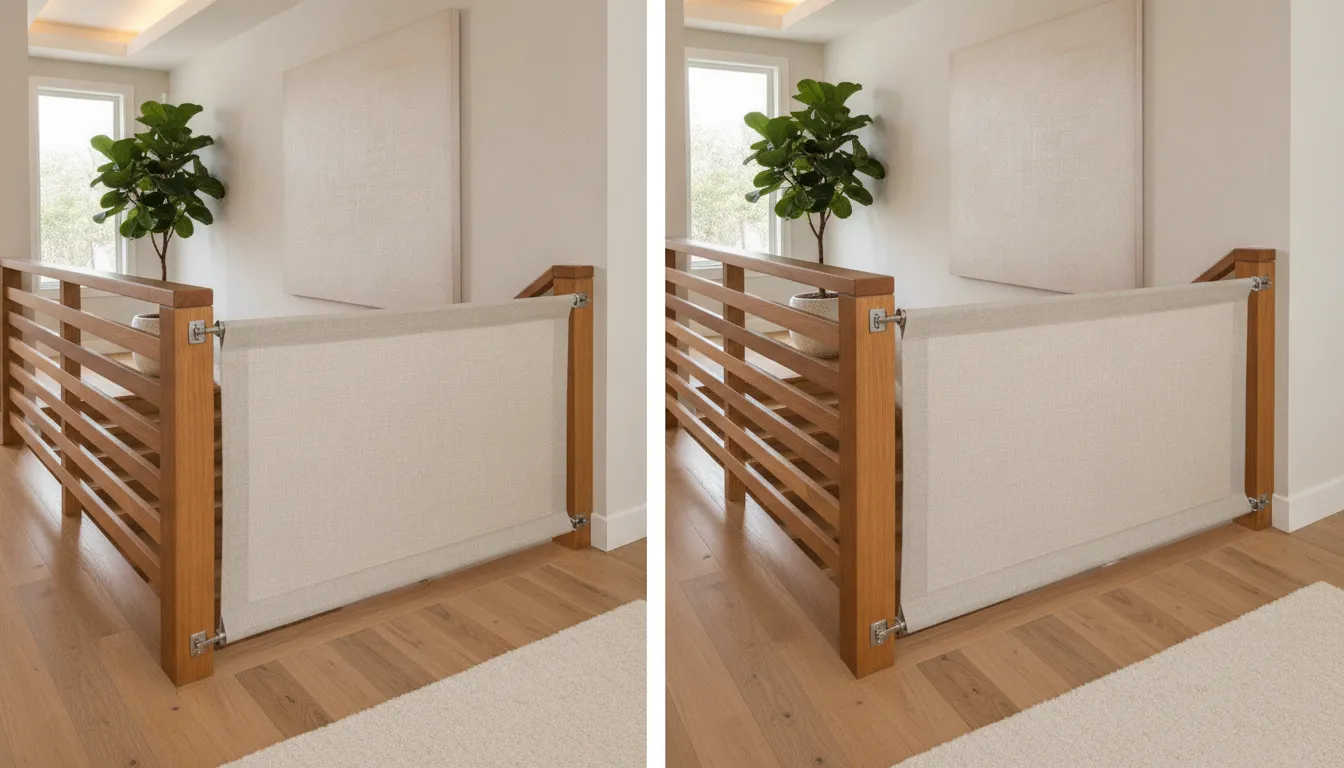
A banister-to-banister opening has a post on both sides. The posts may be square, round, carved, tapered, or set at slightly different angles. A fabric gate made for this configuration can secure around the posts without drilling into valued woodwork. Inspect each post separately because matching materials do not always mean matching shapes.
Review the banister-to-banister fabric safety gate to compare the Regular and Wide options and current fabric choices.
Wall-to-banister openings
A wall-to-banister opening has a solid wall or suitable trim surface on one side and a post on the other. The wall side uses mounting hardware, while the banister side needs a compatible attachment area. Note drywall, wood trim, baseboards, and any offset between the two sides.
If this describes your stairs, review the wall-to-banister fabric safety gate and its installation details before ordering.
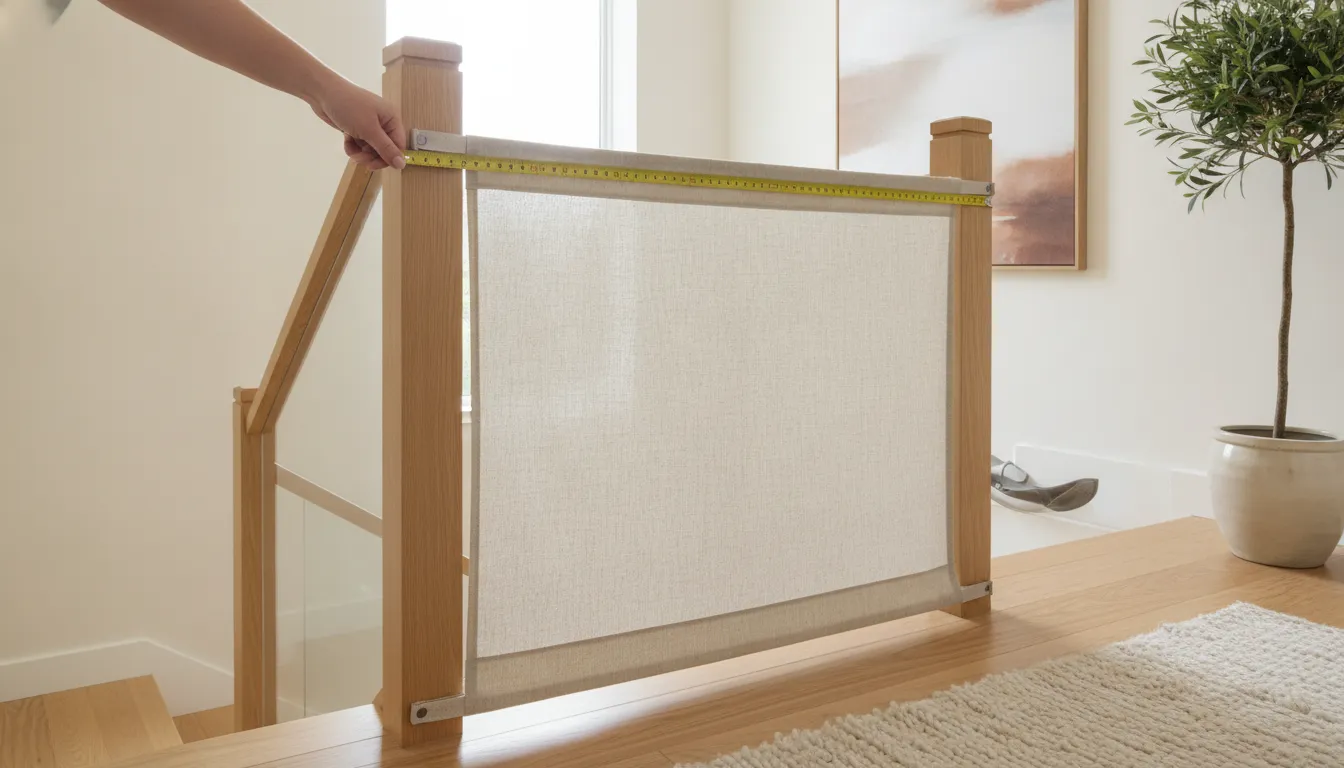
How do you measure stairs for a fabric safety gate?
Direct answer: Measure horizontally between the exact points where the gate will attach, not at the floor or at the widest part of the posts. Check the span at every required attachment point, record each result without rounding, and document surfaces, angles, trim, and other details that could affect alignment.
- Clear the opening. Move decor, storage, and other items so you can see the posts, walls, floor, trim, and baseboards.
- Choose the intended gate location. Follow the product maker's guidance for placement and mounting height. Do not assume the floor-level width is the relevant width.
- Identify the true attachment points. Mark where the straps or wall hardware will sit. Measure between these points rather than between decorative edges.
- Measure the span more than once. Check at all required attachment points. Banisters can taper, and walls may not be parallel.
- Record exact measurements. Write each number down without rounding up or down. A small difference can affect which size fits.
- Document every surface. Note whether each side is drywall, wood trim, a square post, a round post, metal, or another material and shape.
- Photograph unusual details. Take clear front and side photos of angles, thick molding, offsets, carved sections, and baseboards.
Keep the measurements and photos together while you shop. They make it easier to compare your opening with product specifications and explain the layout if you request support. If two measurements differ, do not simply average them. The difference may reveal a tapered post or alignment issue that matters to the fit.
Which The Stair Barrier size fits your measurements?
Direct answer: The Stair Barrier is available in Regular and Wide sizes for its banister-focused configurations. Regular fits openings from 36 inches to 43 inches. Wide fits openings over 43 inches through 52 inches. Compare those ranges with the exact width at your planned attachment points before selecting a size.
Measurements near a size boundary deserve extra attention. Recheck the span, confirm that the tape is level, and make sure you measured between the actual attachment areas. Do not choose a size based on a rounded estimate. Also confirm that the opening stays within the applicable range at each attachment point.
| Recorded opening width | Size path to review | Next check |
|---|---|---|
| 36 inches to 43 inches | Regular | Confirm every attachment-point measurement stays in range |
| Over 43 inches through 52 inches | Wide | Confirm every attachment-point measurement stays in range |
| Outside the listed range or inconsistent | Request fit guidance | Share exact measurements and clear photos |
The gate size is only one part of the decision. You still need the correct banister-to-banister or wall-to-banister configuration. Use the baby gate buyer's guide as a practical comparison point, then verify the current product details before ordering.
Compare Banister-to-Banister sizes and fabric options for your measured opening.
Banister-to-banister vs. wall-to-banister layouts
Direct answer: Choose a layout according to the mounting surfaces, not the overall appearance of the staircase. A post on each side indicates banister-to-banister. A suitable wall on one side and a post on the other indicates wall-to-banister. Offset, angled, or unclear openings should receive a closer fit review.
| Opening | What to inspect | Likely product path |
|---|---|---|
| Banister-to-banister | Both post shapes, angles, and usable attachment areas | Banister-to-banister fabric safety gate |
| Wall-to-banister | Wall material, trim, baseboard, and banister shape | Wall-to-banister fabric safety gate |
| Unusual, angled, or offset opening | Every angle, offset, and possible attachment point | Photo-based fit guidance before ordering |
Why the actual surface matters
Thick trim can move the usable wall attachment point inward. A tapered banister can change the span from one attachment point to another. A post that sits ahead of an opposite wall can create an angled installation. These details are easy to miss when you measure only the most obvious width.
Why pressure-mounted assumptions do not belong on stairs
A stair opening requires a gate and installation method intended for that location. Do not assume a pressure-mounted gate is appropriate for a stairway. Follow the instructions for the specific product and opening, and stop if the mounting surfaces do not match the stated requirements.
What if your banisters are unusual?
Direct answer: Treat curved, tapered, carved, metal, or offset banisters as individual fit questions. Find the stable areas where attachments would sit, measure between those points, and photograph each side from several angles. If compatibility remains unclear, request photo-based fit guidance instead of guessing.
Round, tapered, and carved posts
Look for a stable attachment area that matches the product instructions. Do not assume a narrow carved section or a sharply tapered area will provide the correct fit. Measure the span between the actual planned attachment points. Take close photos that clearly show how the post shape changes from top to bottom.
Metal banisters
Metal posts vary in shape, width, spacing, and finish. Record the dimensions of each post and photograph nearby rails or decorative elements that could interfere with an attachment. Avoid improvising with unrelated parts or changing the stated installation method.
Offset walls and angled landings
An offset wall can move one attachment point forward or backward relative to the opposite post. An angled landing can also change the true span. Measure at the intended gate line rather than across the easiest straight line. For another perspective on placement, read the guide to choosing a baby gate for the bottom of stairs.
Prepare for baby gate installation at a banister
Direct answer: Before installation, compare the delivered gate with your measurements, read every instruction, identify each included part, and inspect the mounting surfaces. Install only with the specified straps, buckles, and wall hardware. Stop if a part is missing, the opening is damaged, or the product does not match the planned layout.
Set up the work area
Keep children and pets away from the opening while you work. Remove trip hazards and place the parts where they cannot roll toward the stairs. Review the complete instruction sequence before attaching anything. This prevents you from discovering halfway through that a buckle, strap, or piece of wall hardware is in the wrong position.
Follow the product instructions
Install every required component exactly as directed. Keep the gate aligned and confirm that each attachment is firm. Do not combine parts from different gates or invent an alternate mounting method. The Wall-to-Banister configuration requires wall-side hardware, while the Banister-to-Banister configuration is designed around two posts.
Check the completed fit
Inspect the full perimeter after installation. Confirm that the gate is aligned, secure, and operating as the instructions describe. Look for loose parts, damage, unexpected gaps, or movement. Recheck all connections regularly because repeated opening, closing, washing, travel, and everyday bumps can affect the setup over time.
The Stair Barrier meets ASTM F1004 safety standards. Still, no safety gate removes every risk or replaces attentive adult supervision. Keep children from climbing or playing on any gate, and stop using a gate if it is damaged or no longer works as intended.
Why choose a fabric safety gate for banisters?
Direct answer: A fabric safety gate gives banister-focused stair openings a practical barrier without introducing the visual weight of a bulky plastic or metal design. The Stair Barrier combines banister-specific configurations, more than 20 upholstery-grade fabric options, machine-washable care, and roll-to-side storage for everyday use.
Designed for real stair layouts
Banister-to-banister and wall-to-banister options address two common stair configurations. The lightweight gate can roll neatly to one side when the opening needs to be clear. For design-conscious homes, the fabric format also feels more integrated with furniture, rugs, and finishes. It supports the brand idea that Safe Never Looked So Good.
Simple care for busy homes
The fabric is machine washable and dryer safe, which is useful in homes with young children, pets, and everyday messes. Follow the care instructions, then inspect every strap and connection when reinstalling the clean fabric. Never rely on a gate until all required parts are back in place and checked.
A premium product made for long-term fit
The Stair Barrier is handcrafted in Georgia and focuses on an attractive, practical solution for challenging stair openings. The premium design is intended for shoppers who want a safety product to work with their home's aesthetic rather than interrupt it. Explore more context on the brand's custom-home approach to baby gates.
Common baby gate measuring mistakes to avoid
Direct answer: The most common errors are measuring only at the floor, rounding the width, ignoring trim, assuming both posts match, and choosing a gate before identifying the mounting surfaces. Avoid these mistakes by recording every attachment-point measurement and requesting help when an opening is angled or unusual.
- Measuring only at the floor. The relevant width is where the gate will attach.
- Rounding the result. Record exact numbers from repeated checks.
- Averaging different widths. Different results can reveal taper or alignment issues that need attention.
- Ignoring trim and baseboards. These details can change alignment and available mounting space.
- Assuming both posts match. Inspect and photograph each side separately.
- Using the widest decorative edges. Measure between the actual attachment areas instead.
- Choosing by appearance alone. Confirm the gate is designed for the exact opening and placement.
- Guessing on an unusual opening. Request fit guidance when angles, posts, or surfaces are unclear.
One final check can prevent a frustrating exchange. Compare your written measurements with the product size range, confirm the correct layout, and look through your photos for anything you may have missed. If the opening changed during renovation or trim work, measure again.
Frequently asked questions
Can you install a baby gate on a banister?
Yes, when you choose a gate made for the exact banister layout and follow its instructions. Identify whether the opening is banister-to-banister or wall-to-banister. Then measure between the intended attachment points and confirm that the product configuration and size match the opening.
Where should I measure for a stair gate?
Measure at the precise location and height where the gate will attach. Check the width at every required attachment point. Record the exact results and note trim, post shapes, angles, materials, baseboards, and offsets that could change alignment.
What if my stair opening is angled?
Take exact measurements and clear photos from the front and sides. Because an angle can change the true span and attachment position, request photo-based fit guidance rather than assuming a standard setup will work.
What size The Stair Barrier do I need?
Regular fits openings from 36 inches to 43 inches. Wide fits openings over 43 inches through 52 inches. Verify the current product details and confirm that the exact span at every attachment point falls within the applicable range.
Do fabric safety gates replace adult supervision?
No. A correctly fitted gate is one part of a safer home setup, but it does not remove all risk or replace attentive adult supervision. Follow the product instructions, inspect the gate regularly, and stop use if it becomes damaged.
Measure carefully, then choose with confidence
The best baby gate installation at a banister begins with exact measurements and an honest assessment of the opening. Identify each surface, measure at the true attachment points, document unusual details, and ask for help when the layout is unclear. Then choose a premium fabric safety gate made for that configuration.
Use The Stair Barrier buyer's guide to find the right fit for your stairs.

Written by Arden Vale
Design & Safety Specialist
Arden provides expert guidance on blending ASTM safety standards with modern interior styling, helping parents and pet owners create secure, beautiful spaces.